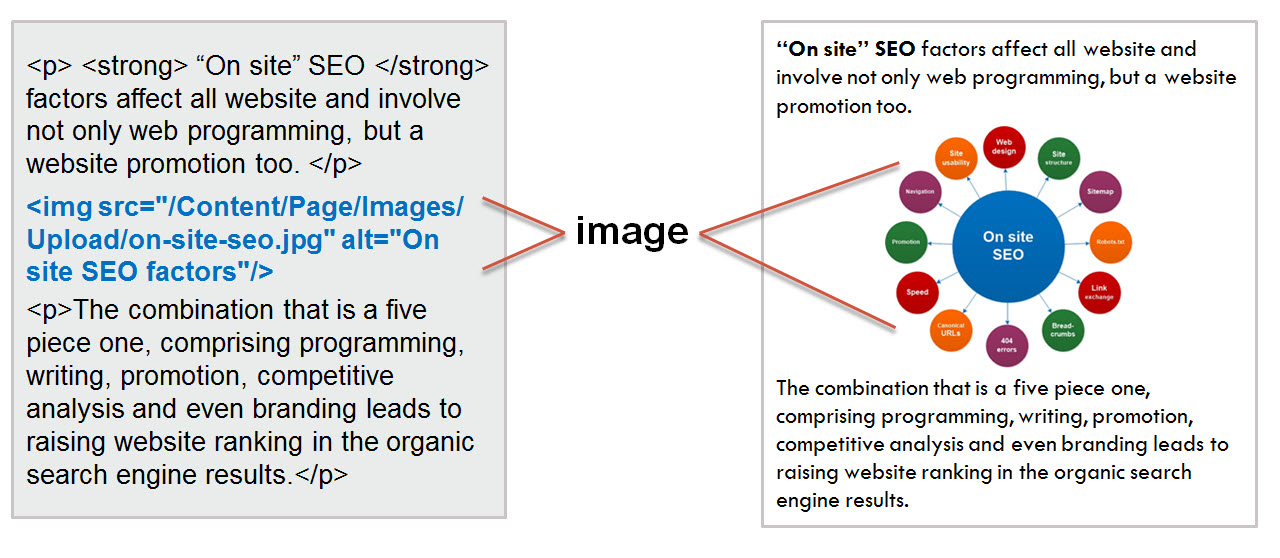
In HTML, images are defined with the <img> tag which contains 2 attributes: “src” – source and “alt” – alternative text.

The “alt” (alternative text) attribute specifies an alternate text for the image if it cannot be displayed. In other words, the “alt” attribute describes the image in words.
“Note, images are not technically inserted into an HTML page; images are linked to HTML pages. The <img> tag creates a holding space for the referenced image.”1
Below, you can see how an image can look on the webpage and in its source code.
It is easier for search engines to find the paths to images if they are stored in one directory.

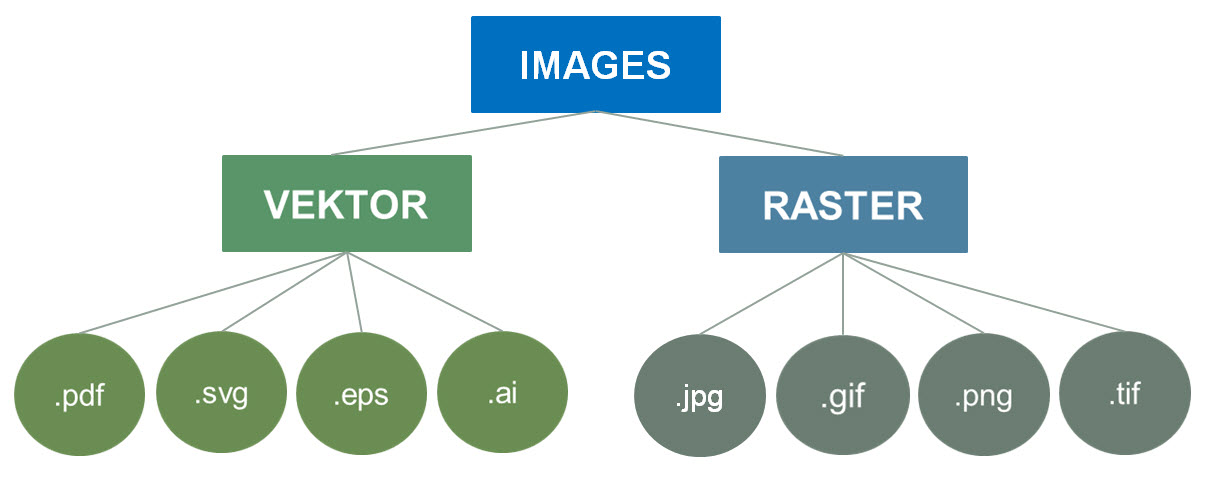
“Vector formats are zoom and resolution-independent”4; they are ideal for logos, icons, and other images that consist of simple geometric forms and graphics that frequently require resizing and need to be displayed at varying sizes. However, vector formats are not good for complicated images such as photos. In this case, the raster image formats should be used. So, “raster images should be used for complex scenes with lots of irregular shapes and details”4
The commonly used and supported by most browsers' raster image formats are JPEG, GIF, and PNG.
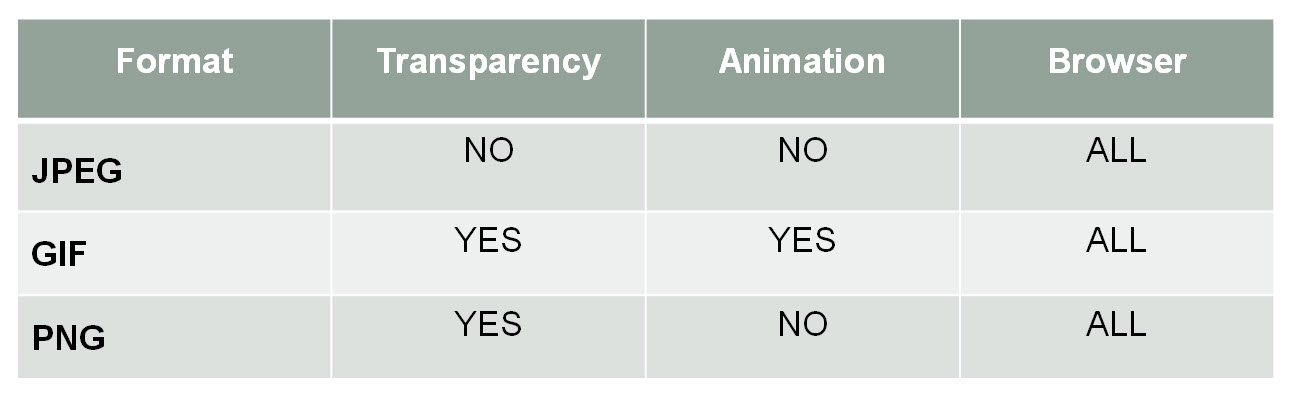
“Differences in image formats are due to the difference in how and which lossy and lossless algorithms are used to optimize the image.”4
The best use for JPEG is the photographs on your website. The best use for GIF is simple web graphics such as buttons, icons, and charts. The best use for PNG is logos, icons, and other images for which a transparent background is preferred.
Different image formats support different features.
The image's physical size gives information about how much "space" the image will occupy on the web page. The width and height of the image measured in pixels are named the pixel dimensions. The bigger the physical size is, the larger its file size. Moreover, in the case user’s screen has a display size smaller than your image’s "natural" size, after downloading the image will be downscaled to the display size. Certainly, you can’t ensure that every image will be delivered at the exact display size; however, you should reduce the number of unnecessary pixels to the minimum, especially, for large images.
The number of pixels in an image is determined by its resolution5. Resolution is measured in pixels per inch (ppi). The more pixels per inch, the greater the resolution. In its turn, the image resolution dictates the image's quality; the higher the resolution, the larger the file size. Be sure that you don’t use more pixels than is needed to display the image at its intended size in the browser. Choose the right image resolution for optimizing the total number of pixels.
The image file size is proportional to the pixel dimensions of the image as is the number of bytes used to encode all pixels.
The fewer bytes a browser has to download, the faster it can download and render content on the screen. The image’s file size dictates the time the image takes to load. The larger the image’s file size, the longer it takes to load. Usually, users don't have the patience to wait for a long time through the web page loads. You need to reduce each of your image file sizes for faster loading. Therefore, you have to make a compromise between your image’s quality and its file size.
Images should have illustrative purposes within your page and emphasize your page's topic; therefore, you should place on your webpage images that have the same subject as your webpage or article.
Your images should not be stuffed somewhere on your page. Make sure that each image is relevant to the content at/in/near which the image is placed.
The right image filename is very important for SEO. From the image’s file name, Google will know what the current image is about. For example, if you are writing about the image formats and are going to add a relevant image, use for your image name “image-formats.jpg” and don’t use names, such as “if6278.jpg”, that will not tell search engines what the current image is about.
It is recommended to have the extension of your filename match with the file type.
Avoid:
The file name is a location to place your keyword. Place the main subject of the image at the beginning of the file name. Remember that an image related to the text ranks better for the keyword it is optimized for.
Avoid stuffing keywords into alt text
The alternative text describes what is depicted in the current image. Optimizing your alt text makes it easier to understand your images for both users and search engines. Always add an alternative text to your image tag.
Avoid:
Certainly, a right-selected and well-placed image can give more information than a thousand words. But, be sure that each particular image is required to achieve a wistful effect. Images often require a large number of bytes; therefore, you should remove unnecessary images from your website.
This will provide Googlebot with more information about the images on your site. You can use a separate XML sitemap file to list your images, or you can add information about your images to your existing XML sitemap. An image sitemap structure is similar to the XML sitemap file for your web pages.
All the time when you are adding an image to your website, remember that optimization of your images can give byte savings and performance improvements for your website.
1. “HTML <img> Tag” w3schools.com. 1999-2015. 30 October 2015. < http://www.w3schools.com/tags/tag_img.asp >
2. “Vector graphics” Wikipedia: The Free Encyclopedia. 27 October 2015. 29 October 2015. < https://en.wikipedia.org/wiki/Vector_graphics >
3. “Raster graphics” Wikipedia: The Free Encyclopedia. 10 October 2015. 29 October 2015. < https://en.wikipedia.org/wiki/Raster_graphics >
4. “Image Optimization” Google Developers. 29 October 2015. < https://developers.google.com/web/fundamentals/performance/optimizing-content-efficiency/image-optimization?hl=en >
5. “Image resolution” Wikipedia: The Free Encyclopedia. 7 October 2015. 30 October 2015. < https://en.wikipedia.org/wiki/Image_resolution >